Difference between revisions of "Laser Etch Monitor Simulation in Python"
Jump to navigation
Jump to search
(aded example laser monitor etch) |
(author credits.) |
||
| (One intermediate revision by the same user not shown) | |||
| Line 1: | Line 1: | ||
| − | Python script to simulate a Laser Etch Monitor (aka. Laser Endpoint Detection). |
+ | Python script to simulate a Laser Etch Monitor (aka. Laser Endpoint Detection). Written by [[Demis D. John]]. |
| − | * [https://github.com/lbolla/EMpy/blob/master/examples/ex_laser_etch_monitor.py |
+ | * [https://github.com/lbolla/EMpy/blob/master/examples/ex_laser_etch_monitor.py Laser Etch Monitor example on EMpy repository] |
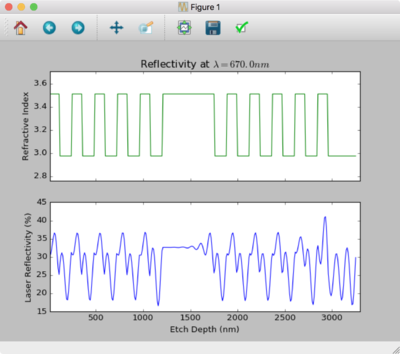
* [[File:Laser Etch Monitor v2 - AlGaAs stack.png|alt= Simulated Laser Monitor Signal vs. Etch Depth.|none|thumb|400x400px|Simulated Laser Monitor Signal for a GaAs/AlGaAs periodic stack.]] |
* [[File:Laser Etch Monitor v2 - AlGaAs stack.png|alt= Simulated Laser Monitor Signal vs. Etch Depth.|none|thumb|400x400px|Simulated Laser Monitor Signal for a GaAs/AlGaAs periodic stack.]] |
||
Latest revision as of 12:54, 21 April 2021
Python script to simulate a Laser Etch Monitor (aka. Laser Endpoint Detection). Written by Demis D. John.
Usage
- Make sure you have a Python installation running, that includes scientific libraries. The easiest method is to use the all-in-one installer "Anaconda". This also installs the Matlab-like IDE "Spyder".
- Download the EMpy repository by Lorenzo Bolla: https://github.com/lbolla/EMpy
- Move "ex_laser_etch_monitor.py" & "nk.py" out of the examples folder, so they're in the same directory as the "EMpy" library folder.
- Edit "ex_laser_etch_monitor.py" to reflect your structure.
- Set up your materials, layers, and then multi-layer stack.
- Refer to the file nk.py for material refractive index/dispersion models, or enter your own. You only need to know n & k at a single wavelength.
- You can use multipliers to produce repeating layers, as so:
- layers = [air] + 5 * [GaAs_DBR, AlGaAs_DBR] + [GaAs_substrate]
- In Spyder, run the script with "Interact with shell after execution" enabled. This allows you to keep messing with the figure and objects after execution, like in Matlab.
