Difference between revisions of "Dicing Saw (ADT)"
Jump to navigation
Jump to search
(moved initialization instructions into own page) |
(→Operating Procedures: added "initial setup before cutting" link) |
||
| Line 17: | Line 17: | ||
== Operating Procedures == |
== Operating Procedures == |
||
| + | * [[ADT 7100 - Initial Setup Before Cutting|Setting up the Saw before Cutting]] |
||
* [[ADT 7100 - Standard Dicing Procedure - Programmed Cut Map|Standard Dicing Procedure - Programmed Cut Map]] |
* [[ADT 7100 - Standard Dicing Procedure - Programmed Cut Map|Standard Dicing Procedure - Programmed Cut Map]] |
||
* [[ADT 7100 - Standard Dicing Procedure - Single Cuts|Standard Dicing Procedure - Single Cuts]] |
* [[ADT 7100 - Standard Dicing Procedure - Single Cuts|Standard Dicing Procedure - Single Cuts]] |
||
Revision as of 03:09, 27 March 2019
|

About
The ADT 7100 Dicing Saw is optimized for multi-angle dicing of thin, tight tolerance products up to 200 mm x 200 mm. It is currently setup for dicing up to 8” diameter wafers. Check the Dicing Saw Recipes page for the blades we currently stock.
Detailed Specifications
Operating Procedures
- Setting up the Saw before Cutting
- Standard Dicing Procedure - Programmed Cut Map
- Standard Dicing Procedure - Single Cuts
Recipe Recovery Procedure
 Click on the Programming Workspace
- Go to any recipe
- Click 'Recipe Import'

- Select 'd: [New Volume]' from 'Folder List'
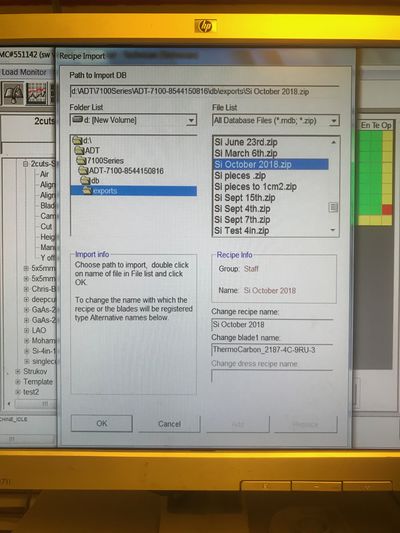
- Open folder 'ADT'. Open Folder 'ADT-7100-8544150816'. Open folder 'db'. Open folder 'exports'
- Find you recipe in the box to the right and double click on it
- Verify group name is correct under 'Recipe Info'
- Click 'OK'
- Click 'Replace'
- Repeat for additional recipes

Recipes
- Packaging Recipes > Dicing Saw Recipes (ADT 7100)
Be sure to also see the methods for protecting your sample from dicing dust, and mounting/unmounting.