Difference between revisions of "GoPro Hero8 Black (Internal)"
(added photo of GoPro + Headstrap) |
(link to Uploading instructions) |
||
| Line 1: | Line 1: | ||
[[File:Photo - GoPro Black 8 and Headstrap.png|alt=Photo of Gopro camera attached to wearable headstrap.|thumb|230x230px|GoPro Black 8 and Headstrap, used for recording trainings]] |
[[File:Photo - GoPro Black 8 and Headstrap.png|alt=Photo of Gopro camera attached to wearable headstrap.|thumb|230x230px|GoPro Black 8 and Headstrap, used for recording trainings]] |
||
| − | Use this camera with various mounts, to record training videos for your tools. |
+ | Use this camera with various mounts, to record training videos for your tools. It records spoken audio very well, automatically canceling much of the background noise. |
You can edit the videos after the fact, but it's not required - a "good enough" video even with mistakes or corrections would be fine. |
You can edit the videos after the fact, but it's not required - a "good enough" video even with mistakes or corrections would be fine. |
||
| Line 116: | Line 116: | ||
Now you have a single file of the GoPro recording. |
Now you have a single file of the GoPro recording. |
||
| − | == Uploading |
+ | == Uploading your Videos == |
| + | * See [[Video Training: Uploading to GauchoCast/Panopto (Internal)]] |
||
| − | '''''To Be Added - using Panopto video player for trainings.''''' |
||
| − | # Log Into [https://gauchocast.hosted.panopto.com GauchoCast/Panopto] with your UCSB NetID |
||
| − | ## We have a paid subscription to this service, contact UCSB OIT if you need your UCSB login added to our account. |
||
| − | # Use the '''[Browse]''' sidebar to Navigate to the folder '''''Nanofab/Drafts''''' ([https://gauchocast.hosted.panopto.com/Panopto/Pages/Sessions/List.aspx#folderID=%22587acccd-daa4-419e-bde2-ac2500f72fc0%22 link]) |
||
| − | # ''TBA'' |
||
| − | |||
| − | === Adding to the Equipment's Wiki Page === |
||
| − | We are not uploading the video to our Wiki. Instead, we link directly to the Panopto video player. |
||
| − | |||
| − | To get the link to the video: In GauchoCast/Panopto, when viewing the file browser: |
||
| − | # Hover your mouse over the video file |
||
| − | # Click the "'''Share'''" button |
||
| − | # Change the "'''Who Has Access:'''" setting to "'''Anyone with the Link, Unlisted'''" |
||
| − | # Copy the URL web link at the top |
||
| − | On your Tool's Wiki page |
||
| − | # Add a Heading section for training videos |
||
| − | # Paste the links to those videos (see the [[Editing Tutorials#Linking to a PDF or other file|Wiki: Editing Tutorials section for help]]). |
||
== Trainings via Webmeeting (Zoom) == |
== Trainings via Webmeeting (Zoom) == |
||
| + | * See [[Video Training: Hosting with Zoom and GacuhoCast/Panopto]] |
||
| − | * Schedule a Zoom meeting at [https://ucsb.zoom.us ucsb.zoom.com] - use your UCSB NetID credentials. |
||
| − | ** ''<<options for the zoom meeting? Waiting room etc.?>>'' |
||
| − | * Require Lab Users/Attendees use a desktop/laptop computer to join, not just phone. They will need to see details on the screen and possibly take notes. |
||
| − | * Ensure you are connecting from a high-speed internet connection, eg. on-campus and wired (not Wifi). You will be streaming video to attendees, so this is important!. The Video Training Workstation in the conference room is set up for this. |
||
| − | * Require all attendees to have video ON during the entire training. |
||
| − | ** This verifies that all participants are present and paying attention - local school/college teachers found this was necessary! |
||
| − | * Use the Zoom > Participants > "'''Mute All'''" button |
||
| − | ** Let users know they can unmute themselves whenever needed, to ask questions |
||
| − | * Share your computer Screen: |
||
| − | ** Hide or Close all your other programs or apps open on your computer. |
||
| − | ** On the Zoom Toolbar, click the "'''Share Screen [↑]''' " button |
||
| − | ** Enable the "'''Optimize for Video Clip'''" and "'''Share Computer Sound'''" checkboxes |
||
| − | ** Select "'''Desktop 1'''" |
||
| − | *** This ensures users can see your mouse moving, instead of selecting only one window. |
||
| − | ** Click the "'''Share'''" button to start presenting your computer screen live. |
||
| − | * In your regular web browser, load the pre-recorded video on the [https://gauchocast.hosted.panopto.com GauchoSpace/PanOpto website], using the '''Browse''' option on the left to find it in the '''NanoFab''' folder. |
||
| − | * Maximize the window size, and play/pause as needed. |
||
| − | * You can use the [→ ←] button to switch which video is larger, or the [_] button to maximize only one video feed. |
||
Latest revision as of 23:15, 12 January 2021

Use this camera with various mounts, to record training videos for your tools. It records spoken audio very well, automatically canceling much of the background noise.
You can edit the videos after the fact, but it's not required - a "good enough" video even with mistakes or corrections would be fine.
We recommend doing online Zoom trainings, during which you screenshare and pull up the recorded video(s), which allows you to play/pause/zoom in on certain parts of the video as needed, and pause to answer user questions.
These is an initial draft of instructions - please feel free to edit! -- Demis 2020-07-02
This procedure uses our GoPro Black 8, and a headstrap to wear it while recording.
Procedure for recording
Outside the lab, before your training
- Fully charge your smartphone
- GoPro 2 spare batteries - make sure both are charged.
- We have a 2-battery charger for keeping the spares fully charged
- Note that the GoPro USB cable is a high-quality (high data rate) USB-C/USB-A cable - cheaper versions usually don't work, so don't lose this cable!
- Download smartphone app called "GoPro" by the company "GoPro, Inc." to your own smartphone.
- Turn on the GoPro camera (hold down power button on the side)
- Connect your GoPro smartphone app to the camera (requires Bluetooth and WiFi enabled).
- Instructions for this can be found on the GoPro website here, also copy/pasted below.
- Pick up your camera:
- Power on your camera.
- Open the utility drawer by swiping from the top to the bottom of the touch display, then select "Preferences."
- Select "Connections" and then tap on "Connect Device."
- Tap on "GoPro App" to put your camera in pairing mode.
- Optional: At this point, you can tap on the "i" icon in the top right corner to see your WiFi name and password.
- Open the GoPro App on your SmartPhone:
- Select the Camera logo at the bottom left corner of the app and it will automatically begin scanning for your camera
- You should see "We Found Your GoPro" and a blue "Connect" button. Tap on Connect.
- Optional: You will see a section to change your camera's name, or you can tap on the bottom button to leave the name as it is.
- Once a name is set your GoPro App will show a live preview of your camera. You're all set!
- Pick up your camera:
- Instructions for this can be found on the GoPro website here, also copy/pasted below.
- Wear headphones for your smartphone (wireless is great, but wired is also ok).
- This helps with checking to see if a video sounds/looks ok.
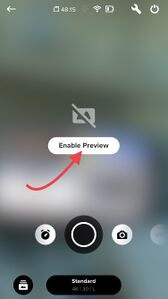
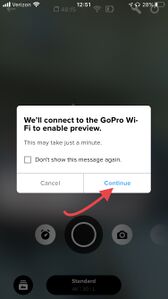
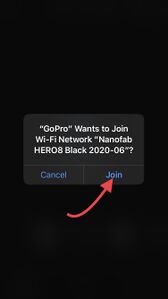
- Put the GoPro on your head mount, and launch the GoPro phone app and "enable live preview".
- Detailed Instructions for Live Preview are below.
- Adjust the angle of the camera so the preview shows what you’re looking at. You want to be "naturally" looking at something, and make sure the GoPro shows the same thing.
- Usually the headmount will aim high - looking above what your eyes are looking at, so adjust it to point down, typically ~30-40° downwards.

In the Lab: Recording your video
- (optional) Bring wired or bluetooth headphones that you can use with your smartphone - this is only for listening to video while in the lab. The "live" audio will be from the GoPro's built-in Mic - it works fine in the lab.
- Turn on camera - hold down the power button on the side.
- Place camera on mount - either head mount (use your own assigned head mount), or Clip mount etc.
- On GoPro smartphone app:
- Enable Live Preview to view the video from the SmartPhone App.
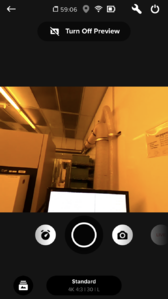
Head-mounted camera is often aimed high at first.


- Choose Video Mode and "Standard" preset
- The "standard" preset is set for training purposes (reduced field of view, high resolution, reduced motion correction)
Choose Video mode - 2nd from left. 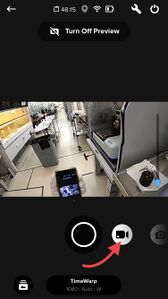
Use "Standard" settings. 
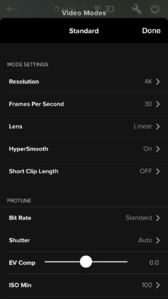
Settings menu options. 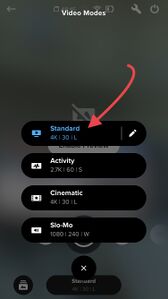
"Standard" settings for NanoFab trainings (Initial version, as of 2020-07-01 Demis). Have been slightly updated compared to pic, 2020-10.


- Adjust camera angle using Live Preview on smartphone:
- Look naturally at some object, and make sure the SmartPhone's preview is showing the same object centered in the screen.
- Typically the camera is angled too high by ~30-40°.
- Adjust the camera's angle on the your mount, so that what you look at is centered on the screen, then tighten. (Same as done outside the lab.)
- Start/stop the video recording with the Circle button on the SmartPhone app.
-
- You can always stop the recording and restart, with the intention of piecing the recording together at the end. However, it is much less effort to only do a single take and fix mistakes during the recording, as you can spend a lot of time on video editing.

- You can look at saved videos through the smartphone app, to check your recording, in the My Media section of the GoPro App. It may require you to download the video to your smartphone, which can take a while. Sometimes it shows a lower-quality version just to avoid downloading - don't worry, the "full" version will usually look and sound much better.
- This is where headphones in the lab are very helpful, so you can hear the audio of your recordings.
Saving the Video to your computer
There are two ways to save the video. I prefer to plug the GoPro into a laptop/desktop computer (good for posting to Wiki and online trainings via web-meeting). You can also save it to your smartphone wirelessly, but this appears to be more complex for our purposes (good for social media).
- Outside the lab, at your desktop/laptop computer:
- Plug the GoPro camera into your computer using the supplied USB-A to USB-C cable.
- This is a high-data rate cable - cheaper versions are known to not work properly, so don't lose this!
- Turn on the GoPro Camera by holding down the power button on the Side.
- On a Mac: (approximate instructions, not exact)
- Launch Applications / Image Capture.app
- Select the GoPro camera in the sidebar - you will see all the recorded videos and photos.
- Choose a folder to Download into on the bottom of the screen
- Select the media to download (use Shift or ⌘ to select multiple items)
- Click "Download Selected" or "Download All" and wait for it to complete, it can take some time.
- The files will be downloaded to the specified folder.
- Use the Delete button
 to delete selected files from the GoPro memory card. You can select multiple files with the Shift or Command keys.
- On Windows: (approximate instructions, not exact)
- Open My Computer > HERO8 BLACK
- Copy the files from the HERO8 drive to the desired destination folder
- Delete files from the GoPro memory card with Shift+Delete (
 aka. Forward-Delete)
Editing Video
GoPro video is always split up into sections of about 15min each, automatically on the camera. This is not changeable on the Gopro.
- Use the free software OpenShot to stitch your videos together.
- Just drag your files into the timeline in order. You can use the Creation date of the files to figure out the correct order.
- GoPro's File naming convention:
- The first digit is the number in the sequence
- The second/last digit is the video recording number - this is counter-intuitive.
- Example - The following sequence would be the first video shot on the GoPro, in order:
- GH0010001.mp4
- GH0020001.mp4
- GH0030001.mp4
- The Second video shot (underlined) would be the following files:
- GH0010002.mp4
- GH0020002.mp4
- GH0030002.mp4
- Export as :
- Target: MP4
- Profile: HD 720p: 30fps (1280x720)
- Quality: High
This takes ~30min to stitch a ~1hr video.
Now you have a single file of the GoPro recording.